Left Over Tart
This recipe is ideal for when you have some left overs you want to use up in the fridge. It is also great in summer as it does not have to be eaten piping hot!
Ingredients
- 2 sheets store bought puff pastry
- 200 grams cream cheese spreadable or softened
- 1 egg lightly beaten
- Flour for dusting
Border Options - adjust or omit depending on your flavour preferences
- 1 tsp poppy seeds
- 1 tsp white sesame seeds
- 1 tsp black sesame seeds
- 1 tsp garlic granules
- 1 tsp salt
- 1 tsp pepper
- 1 tsp finely grated parmesan cheese
Topping Options- adjust depending on what leftovers your have or to taste
- Smoked salmon strips
- Shredded chicken or roast BBQ chicken
- Ham
- Prosciutto
- Asparagus spears
- Pickled onion
- Red onion finely sliced
- Roast Vegetables (pumpkin, carrot, sweet potato, capsicum)
- Cucumber ribbons place in iced water to keep crisp
- Shallots finely chopped
- Avocado diced
- Mushrooms fried in butter
- Sundried tomato
- Fresh tomato
- Capsicum
- Stuffed bell peppers
- Capsicum strips
- Spinach or rocket
- Fetta or goats cheese
- Infused olive oil- garlic, lemon or chilli
- Herbs of choice- dill, parsley, basil, oregano, lemon zest etc
Instructions
- Preheat oven to 180℃.
- Lay the two sheets of pastry on top of each other. Use a rolling pin (see notes) to gently roll out the pastry and to join together.
- Prick the pastry with a fork several times all over.
- Beat the egg lightly to create egg wash. Brush over pastry so it is covered. This will help to get a beautiful golden colour. If you are short on eggs, you could use a tablespoon of milk in its place. If you don’t have a pastry brush you can use a spoon, flat knife or a fork to distribute over the pastry.
- Mix together the border ingredients you want to use in a bowl, and sprinkle around the outside edge to create a border. (see notes if using garlic).
- Place in the oven and bake until golden brown. This will vary depending on your oven, as smaller ovens tend to cook faster. Approx 10-20 minutes (see notes) Once golden, remove from the oven.
- Spread the softened cream cheese across the pastry. Be generous.
- Now you can add your toppings by layering. Start with your meat/s, followed by vegetables, finishing with herbs and a drizzle of olive oil.
- Now you can slice and serve.
Notes
Notes 1- Cucumber ribbons
You can easily create vegetable ribbons with your vegetable peeler.
Notes 2- Rolling pin
If you are not travelling with a rolling pin, you can use a tumbler, round cup or glass instead.
Notes 3- Cook time - Garlic
If you like your pastry really golden, I would suggest adding your garlic to the border partway through the cooking process, as the garlic can easily burn which can leave an unpleasant taste.
Notes 4- Pairings
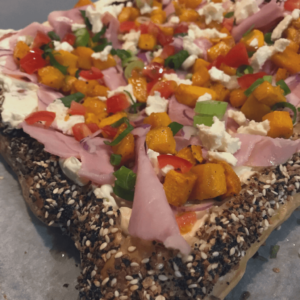
In the image for this recipe, we have used ham, red onion, shallots, fetta, fried mushrooms and roasted pumpkin.
Smoked salmon pairs well with dill, cucumber ribbons and some lemon zest.

Don't have an oven in your setup?
We have only tried cooking the pastry in an oven, but with the right settings and accessories on your BBQ, we are sure you could do this in your BBQ too. Please refer to your BBQ manual or website for directions on how to best achieve this.